BytesOfProgress
Wiki
Websites with Cloudflare Tunnel
Cloudflare Tunnels are really useful if you want to publish your website or webservice on the internet wihout opening ports, paying for a static IPv4 or setting up dynamic DNS and worrying about SSL certificates.
It even lets you publish multiple services / websites without you needing a public IPv4 at all!
In this guide we will take a look on how to set up cloudflare tunnels easily. This will work for every webapp, although hosting video streaming and large files is restricted by Cloudflare's Service-Specific Terms for the CDN.
For this you will need a domain name managed by Cloudflare by either using Cloudflare as your domain registrar or pointing your domain to Cloudflare's nameservers.
Setting it up
You have the option of creating a tunnel via the dashboard or via the command line. I recommend getting started with the dashboard option, since it allows you to manage the tunnel from any machine, and anywhere.
Step 1: Sign up for a free Cloudflare account.
Step 2: Navigate and login to your Cloudflare Zero Trust dashboard
Step 3: Navigate to Networks ---> Tunnels and select "create a tunnel".
Step 4: Choose Cloudflared for the connector type.
Step 5: Enter a name for your tunnel and click "save".
Step 6: Check that the environment under "Choose an environment" reflects the operating system on your machine, then copy the command in the box below and paste it into the terminal of your server.
Once the command has finished running, your connector will appear in the tunnel options. Click "Next".
Step 7: In the Public Hostnames tab, choose a Domain and specify any subdomain or path information and specify a service, for example "https://localhost:8000". Make sure to select the protocol the website is serving right now.
Step 8: Under Additional application settings, you can specify any parameters you would like to add to your tunnel configuration. Then save your settings.
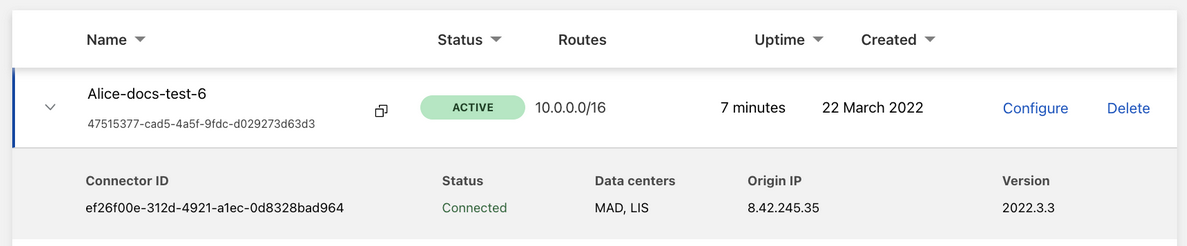
Step 9: After saving the tunnel, you will be redirected to the Tunnels page. Look for your new tunnel being listed with its active connector.
Forcing SSL
Step 1: Navigate to your Cloudflare Dashboard
Step 2: Choose your domain, and then navigate to "Rules ---> Page rules"
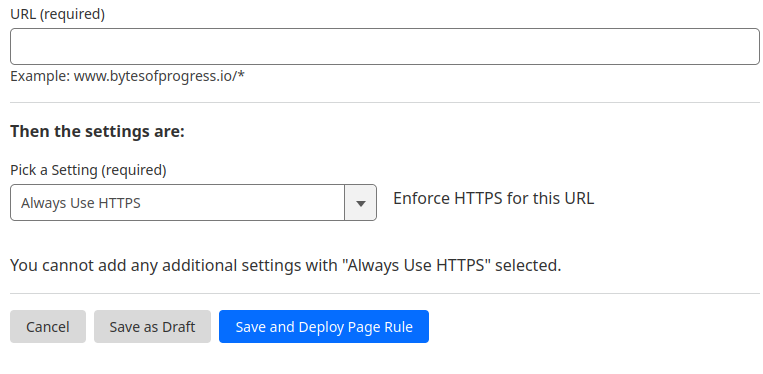
Step 3: Click on "Create page rule".
Step 4: Enter the URL you want to enforce HTTPS for, and select "Always Use HTTPS" in the dropdown-menu.
Step 5: Click on "Save and deploy page rule".
back